How to Track Clients Leads in Honeybook with Google Analytics and Google Ads
If you use a CRM like HoneyBook, Dubsado, or HelloBonsai to manage your leads, you have a data problem.
These platforms are "Walled Gardens." For security reasons, they do not allow you to paste custom Google Ads tracking code onto their contact forms.
The result? You launch a Google Ads campaign. A user clicks your ad. They fill out your HoneyBook form. And then... silence. You don’t know if it converted.
The result? A user clicks your ad (or finds you on SEO). They fill out your form. And then... silence.
Google Ads reports "0 Conversions" because the signal died inside HoneyBook. You don’t know if your SEO is working.
You are flying blind, spending money without knowing which campaigns, ad groups, keywords, ads or absolutely anything are actually generating revenue. With SEO you are spending the time writing posts, linking and sharing and you can’t see if it is working to pay the bills.
This is the fastest way to lose money in Google Ads and feel like SEO isn’t helping your business.
So, today, I’m sharing the "Workaround" I use to fix this.
It’s called The Redirect Method, and it works for any service provider using Squarespace and a third-party CRM, like HoneyBook, Dubsado, or HelloBonsai.
It allows you to track conversions in both Google Ads and Google Analytics 4 (GA4) with 100% accuracy.
The Strategy: Don't Track the Form, Track the Destination URL
Since we cannot put a tracking tag inside the HoneyBook form, we have to move the finish line.
Instead of trying to track the submission (which happens on HoneyBook’s server), we are going to track the arrival (which happens on your website).
The Workflow:
User fills out the form.
HoneyBook auto-redirects them to a "secret page" on your website.
Google Ads sees them land on that page and marks it as a "Win."
Here is the step-by-step setup to set up conversions on Honeybook, Dubsado, or HelloBonsai.
Step 1: Build the "Secret" Success Page
Create a new page in Squarespace. Keep it simple.
Title: "Inquiry Success"
The Message: "Success! I’ve received your request. Check your inbox for a confirmation."
The URL Slug: /inquiry-success
Critical Step: You must hide this page from Google. You don't want random people finding it via search and skewing your data.
In Squarespace: Go to Page Settings (Gear Icon) > SEO.
Toggle: "Hide Page from Search Results" (No Index).
Step 2: The Redirect
Now, connect the the page to Honeybook.
Open your HoneyBook Smart File (or Contact Form).
Click on the Submit Button settings.
Look for "After Submission" or "Button Actions."
Select "Redirect to URL."
Paste your full URL:
https://yourdomain.com/inquiry-success
Step 3: Setting Up the Tracking (The Two Methods)
To get a complete picture, we need to track this in two places. We will handle them differently.
Part A: Google Analytics 4 (The "No-Code" Way)
For GA4, you don't need to touch any code. You just need to tell Google that this specific page view counts as a "Key Event."
Open Google Analytics and go to Admin > Events.
Click Create Event.
Name it:
lead_form_submittedSet the Conditions:
event_nameequalspage_viewpage_locationcontains/inquiry-success
The Final Step: Go to the "Key Events" tab (formerly Conversions) and mark this new event as a Key Event.
Result: Now, GA4 counts a "Lead" every time someone hits that URL.
Part B: Google Ads (The Modern "G-Tag" Way)
Updated for the 2026 Google Ads Interface
Google has moved the tag installation to a new home called "Data Manager." This is the most accurate way to ensure your site is properly connected for both tracking and audience building.
The Exact Click-Path:
In your Google Ads account, click the Tools Icon (left menu).
Click Data Manager.
You will see a section for "Google Tag". Click Manage.
Click "Installation Instructions."
Click the button that says "Select Your Platform" and choose Squarespace.
The Setup: Google will present you with two options.
Option 1: Install with Tag Assistant (You can skip this).
Option 2: "Manually install." (Look for the section that mentions your Tag ID starting with AW-).
The Instructions: Google will essentially generate a customized guide for you right on the screen. It will tell you to copy your unique AW- ID and paste it into the specific Squarespace field (usually Settings > External API Keys or Developer Tools depending on your Squarespace version).
The Test: Once you paste the ID and save it in Squarespace, go back to the Google Ads tab. They have a "Test Installation" button.
Enter your website URL.
Click Test.
Google will ping your site and give you a green checkmark if it is talking to the server correctly.
Pro Tip: Once this "Base Tag" is verified, your account is live. It is now silently building your audience list (Data Banking) from every visitor who lands on your site.
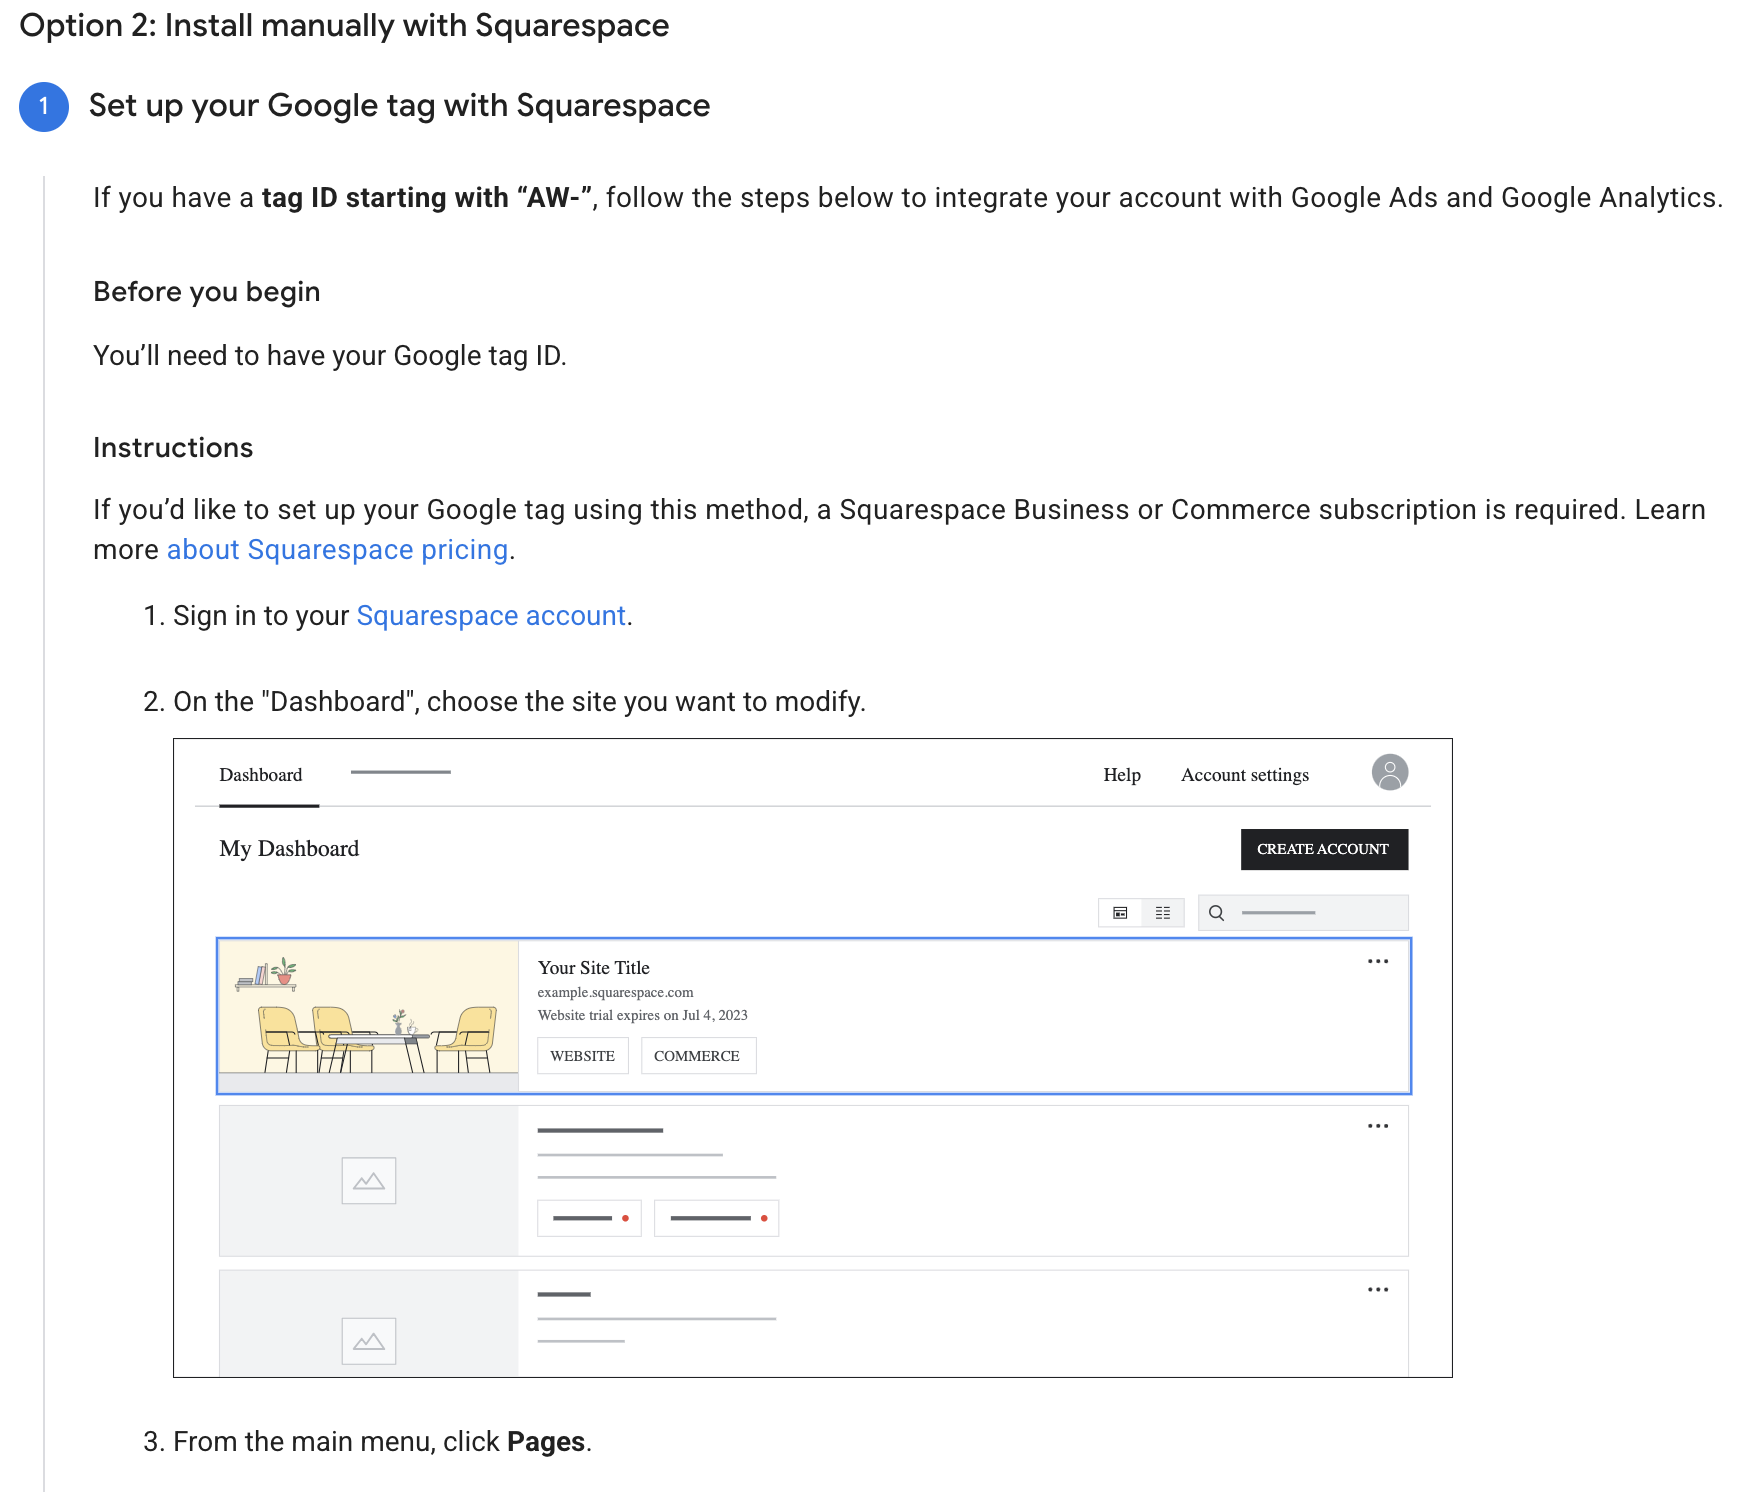
Picture of how to install the tag with Google Ads and Squarespace
Why I Do This Even If You Aren't Running Ads Yet
I recently set this up for a client who isn't spending a dime on ads yet. Why?
Data Banking.
By setting up this tracking infrastructure now, we are building “audiance data” Every time a lead comes in from Instagram, LinkedIn, or SEO, Google Ads adds them to a "Converters" list.
Six months from now, when she is ready to spend $20/day on ads, she won't be starting from zero. She will be able to tell Google:
"See these 500 people who booked me? Go find more people like that."
Confusion is a billable hour. Don't let your CRM be a black hole. If you are struggling to connect your HoneyBook forms to your Google Ads data, you have a foundation problem, not a marketing problem.
If you need help then booking a coaching call would be perfect for this. I will jump on a call and fix this live with you in a recorded call.
I also have a discount for Honeybook which I wrote about in this blog post, because I use Honeybook to streamline and manage leads for my business.
Discounted for the Holidays
Nov 17 – Dec 31